Home » Posts tagged 'UAN'
Tag Archives: UAN
How to transfer EPF online using UAN
At today’s time and age, private jobs are very popular which also means that job change is common. And while changing jobs, one is required to finish a lot of paperwork and collect dues etc.
EPF (Employees Provident Fund) is a retirement savings scheme which is a corpus of funds built through regular, monthly, contributions made by an employee and his / her employer. It is also one of the most popular forms of long-term retirement savings among the working population in India.
Hence, while changing jobs it is also important to transfer your PF account. Earlier the transfer was little inconvenient as it required a lot of paperwork like submitting the transfer form from an old employer to the new one, but with launch of an online self-service portal by EPFO this has become easier and hassle – free.
How to Transfer EPF Account Online
The process of transferring EPF account has become easy and hassle – free with the introduction of Unified Account Number (UAN) for EPFO subscribers.
Read the below points in order to transfer your EPF account
Register on the EPF Member Portal
In order to transfer your EPF account, you have to log in to the official portal of EPFO (Employees Provident Fund Organization) and become a member.
Portal for Online Claims Transfer
And the users are required to visit the online Transfer Claim Portal and register a claim for transfer of EPF. The login details for this portal are the same as those for the member portal.
Check eligibility
Also make sure to check your eligibility in order to do the same. As there are cases where users are required to fill a physical form (Form 13).
Process
If you want to transfer your EPF account and you are eligible to do the same visit the online portal and ‘Request for transfer of funds’ and enter the PF numbers of your previous and current employer. The previous and current employer is required to attest the form online. On filling in the details, a PIN will be generated and sent to the registered mobile number.
Authentication
You will be provided with a tracking ID in order to track your application online. The printable Transfer Claim Form (Form 13) can be saved in the system. Print out Form 13, sign it and submit it to the employer to complete the process of claim submission.
Form 19 – PF Settlement Form
Nowadays, the withdrawal of the Employee Provident (EPF) has been a recent addition to the facilities that can be availed online. Many of the financial transactions are being conducted online which means that now the EPF members do not have to struggle to wait and visit their employer or the EPFO Staff. The claim can be settled within a few hours. About 85% of the EPFO’s workload is due to the claims processing which is now covered in the online EPF withdrawal.
In this article, we will be talking about the PF settlement form (Form 19) and the documents required.
If a person is a part of the EPFO Family then, then he/she has to fill in and submit the Form 19 for the final settlement of the Provident dues. Form 19 should be filled in by the member with detailed and correct information. It should also be attested by the employer for a hassle-free and a quick settlement.
Employee’s Provident Fund Account Settlement
For the settlement of the Provident Fund, the member has to fill in and submit the Form 19. The Form 19 can be easily obtained by downloading it from the Official website/portal- www.epfindia.com
The member has to fill in the required details before submitting this form to the previous employer. In many cases, the salaried persons do not remember their EPF account numbers, in such cases, they can make an official request to the human resource development of their companies and they will establish a contact with the ex-employer of their employers. The members can make their contact with their ex-employers and can obtain the required information.
In some cases, it has been seen that the ex-employees may shut up the shops or while there have been cases where the salaried employers have to quit their establishment under certain unfavorable circumstances. This can be difficult to make any contacts with the previous employers.
The members can fill in the PF Settlement Form (Form 19) along with the required details. The form has to get attested by the Bank manager where they have their EPF Account. The members have to provide their personal details along with the Proof of Identity. The Form 19 has to be submitted to the Regional Provident Fund Manager for the approval and seal of authentication details.
What does Form 19 entail?
The PF Settlement form allows the member to withdraw the provident fund balance. This can be in cases such as after the job retirement, quitting of the job or superannuation etc. Form 19 requires the following to get filled by the user.
- Name of the member – This section should be filled with capital letters. It is to be noted that the name in the application form, bank account, and the claim form should not differ
- Father’s Name – should be filled in legible capital letters. The name should not differ in the application form, bank account, and the claim form.
- Date of Birth
- Name and complete address of the establishment/factory (including the Pin Code).
- Provident Fund Account Number (Format: State/Office/Establishment Code/Account Number). The allotment number remains the same until the user/applicant does not quit the factory/establishment and transfers the fund to the new employer.
- Universal Account Number
- Joining Date (establishment)
- Date of Leaving Service
- Reason for leaving the service. This can be in cases such as Voluntary Retirement Scheme, Disability, Migrating Abroad (permanently), retrenched, resigning (claim should be submitted after two months of leaving service, The women who are leaving the service because of marriage will be given immediate settlement), the service terminated due to the ill-health of the member, discontinuation of the business of the employer or any other factor beyond the member’s control.
- Permanent Account Number(PAN)
- Copies of Form No. 15G/15H
- Complete address of the member (house number, street name, block, city and Pin Code)
- Payment Mode (for the accumulations below Rs 2000, payment is made through the money order and while for the amounts above Rs 2000 the payment is done through cheque).
- Savings Bank Account Number, Bank Name, Address in addition to the IFSC Code. It is important to note that the account payee cheque is sent to the scheduled bank which maintains the savings bank account of the member. Therefore, the full address of the bank branch should be mentioned.
- Signature of the member
- Advanced stamped Receipt (in case the payments are made through cheque, the receipt must be signed by the member. A one rupee revenue stamp is also affixed by the member and the amount will be filled by the OIC at the office of EPFO).
- The contribution for the current financial year (the information includes the contribution along with the wages). In an alternate Form, 3A is also furnished with an attestation by the employer.
- The signature of the employer along with the seal of the employer. If in case the factory/establishment has been shut down, the attestation can be done from any of the Officials listed down below:
- Sub-Postmaster
- Gazetted Officer
- Bank Manager
- Magistrate
- Chairman of Municipal Body
- Head of the Village Panchayat
- Head of an Educational Institution (recognized)
- Central Board of Trustees
- Member of the Parliament/ Legislative Assembly
- Liquidator (appointed by the Court)
Update your UAN and EPF Details Online using EPFO Unified Portal
Aadhaar card has been made mandatory for various purposes by government of India in order to have transparency into the system. For that it had made this 12 digit biometric card to be linked with your Employee Provident Fund (EPF) account and with your UAN Universal Account Number (UAN).
Read here about How to link Aadhaar with your Employee Provident Fund (EPF) Account?
And in order to avail all the facilities provided by the Employees Provident Fund Organization (EPFO), it is important to fulfill the linkage immediately.
EPFO have made some significant changes in its working procedures by introducing UAN account in it. This step has been taken to make the process smooth for the EPF account holders.
By explaining it further, an EPF account needs to be changed every time an employee changes his / her job, which is a frequent case in private sectors. And it is very inconvenient for an employee to have a new EPF account every time they change their job and to visit employers of previous organization while withdrawing their account and this process demands a lot of paper work to get his PF (Provident Fund) balance transferred or withdrawn.
Keeping this in mind, EPFO changed the whole process and introduced the 12 digit (Universal Account Number) UAN, which will remain the same even you change your organization, unlike your EPF account.
The EPF have issued UAN number to every active member of EPF. According to sources, nearly 7.86 crore UAN number is allotted to the members of EPF.
How to Update EPF / UAN Details Online using unifiedportal.epfindia.gov.in
EPFO (Employees Provident Fund Organization) constantly strives to make the procedure better and easy for the EPF account holders. They have also started the online portal for their members to update or make correction of details in their EPF UAN online. Follow the below mentioned steps in order to do the same:
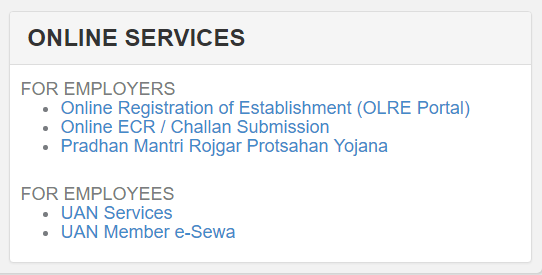
- Visit the official page of EPFO and on the home page look for “UAN Member e-sewa” on the right hand side under “FOR EMPLOYEES” section.
EPF Official Portal unifiedportal.epfindia.gov.in - Once you click on that option that will redirect you to a new page where you will have to login to your account by proving your UAN number, password and enter the captcha code displayed on the screen.
- After providing all the above mentioned details, you will be redirected to your EPF account where you can make the necessary changes or update your details.
- You can click on the “Manage” option and click on the “CONTACT DETAILS” from the drop down in order to make changes in your contact details.
- For making other changes click on the “Manage” option and from the drop down select “KYC” where you can make other required changes.
How to Link Aadhaar with UAN account
The Employee Provident Fund Organization has made it mandatory to link their Aadhaar number with the EPFO and UAN account. This decision made by the Government has created a beam of worriment among the EPFO officials. Now the EPFO has started to provide all the benefits to the deserving beneficiaries directly into their respective bank accounts.
If in case you have not linked your Aadhaar with the bank account then you cannot avail the facilities that are provided by the EPFO. If you pretty confused about the process of how to link your Aadhaar with the bank account then, this article will help you to understand and know the step by step procedure of how to link Aadhaar with the UAN account.
The UAN is providing two modes to link the Aadhaar- Online and Offline. The official website of the EPFO is www.epfindia.gov.in
Before getting to the process let us first know about the benefits of linking Aadhaar with the UAN and EPFO Account
Benefits
The benefits of linking Aadhaar with the EPFO and UAN is the biggest KYC document. It contains the necessary details like
- Name
- Date of Birth
- Address and
- Photograph
- Merging the UAN numbers into a single UAN is possible and easy to use.
- Linking Aadhaar will cover many documents like it acts as both Proofs of identity as well as Proof of Address.
- At the time of the withdrawal process, it will help EPFO to easily verify the KYC credentials.
Documents required for Linking Aadhaar with EPFO and UAN
- A copy of PAN Card which must be self-attested.
- One canceled cheque of your account. This is the requirement of the account details like Account holder’s name, IFSC Code etc.
- A copy of Aadhaar that is self-attested.
How to link Aadhaar with EPFO and UAN Online
The step by step procedure of linking Aadhaar with EPFO and UAN are as follows
- Visit the official website of EPFO- www.epfindia.gov.in
- On the homepage of the screen, go to the section and select “Our Services” and on further clicking select “For Employees“.
- A new page will pop up and will guide you to the next page where under the “Services” section, the members have to click on the “UAN Member e-sewa link” option.
- After clicking on this link, it will redirect you to a page called “Welcome Members“, where you have to login yourself in the login section and enter the UAN and the password.
- After entering the UAN and the Password. Click to sign in.
- After signing in, the applicant’s home page will open.
- Now go to the Profile section and you will find an option called “Update KYC information”. Click on that link.
- In the update KYC information, you have to enter the PF number in the “Current Member ID“.
- After entering the PF number, you will have to upload the soft copies of all the documents that are mentioned.
- After successfully uploading your documents you will have to wait for the approval that you’re linking is successful.
The required time for successful submission of the Aadhaar Card details is around 15-20 days.
How to Link Aadhaar with EPF/UAN Offline
For linking Aadhaar with EPF and UAN offline, the EPFO has recently launched a facility for all the members to update Aadhaar through offline. The EPFO has introduced a facility called “Aadhaar seeding” with the support of the Common Service Centers (CSC) and CDAC. All you have to do is visit the nearest field offices of EPFO or the CSC outlets along with the required documents to link Aadhaar with UAN.
The documents that are required for the Aadhaar seeding with UAN and EPF are:
- Universal Account Number (UAN)
- Copy of a PAN Card
- IFSC Code of the Given Bank
- Copy of the Aadhaar card and
- The Bank Account Number
How to Update Aadhaar in EPF/UAN Portal
- The first step is to log in to the official portal.
- After login, on the homepage, there is a menu section where there is another sub-section named “Manage“.
- Now click on the “Manage Section” and a drop-down menu will appear. Click on the “KYC“.
- After clicking on the KYC, it will lead you to a different page where you can find different sections for updating. Let us click and select the “Aadhaar” section.
- After selecting the Aadhaar section, it will give you the access to update the details like Document Number, Name as per the document.
- Now finally, click on the Save button to end up the process. It will show the Aadhaar pending KYC information.
How to activate UAN (EPF Universal Account Number)
UAN is the acronym for Universal Account Number. It was introduced the Employees Provident fund for a quick and a hassle-free transfer of PF accounts. Before the introduction of the UAN whenever there is a job change, employees either withdrew the entire PF amount or leave the PF account unattended. However, with the introduction of the Universal Account Number an employee can simply transfer their PF account from one organization to another by providing the UAN number to the new employer. The UAN is a 12-digit unique number provided to every salaried individual. This number acts as an umbrella number that links all PF accounts of an individual under it.
Activation of The Universal Account Number
The UAN number is provided by the employer whenever he or she starts working. In case an employee is unaware about the UAN number then he or she can check it on top of the pay slip. In case an employer does not give the number then an employee can activate the number with the following steps:
Documents required for UAN Activation
Before starting the process of UAN activation a person should have the following documents available:
- Last working day in the previous organization
- Bank passbook as it contains all the bank details like account number, IFSC code etc.
- UAN given by the employer
- KYC documents like passport,driving license,voters id card,ration card,ESIC card.
Steps to activate UAN Online
The following steps must be taken in order to activate UAN:
- visit the official website of the Employees Provident Fund i.e. https://unifiedportal.epfindia.gov.in
- After this enter the UAN number, EPF number and mobile number.
- After entering the details, a PIN code will be sent to your registered mobile number
- The employee is required to provide the PIN number to activate the UAN
- The registration process will be completed once the employee generates the user id and password.
Benefits of The Universal Account Number
The introduction of UAN ensures that an employee after changing his or her job does not have to contact their previous employer or go through a process that involves lot of paperwork. It is a stress free and an easy process. Further an employer is also notified about his or her monthly PF deduction and thus it also more transparency. Besides this some of the other benefits of the Universal Account Number are:
- Employees can easily transfer, withdraw and download UAN card.
- Easy and hassle-free transfer of PF account. A UAN can hold a number of PF numbers.
- Further an employee does not need to change the UAN number even after job change as the UAN number remains the same throughout a person’s lifetime
- The UAN number also ensures less intervention from the part of the employer. It helps in maintaining a direct relation between the employee and the EPFO.
- The UAN has also ensured more transparency on the PF account. An SMS alert is sent to the employee every time money is credited or debited from the PF account